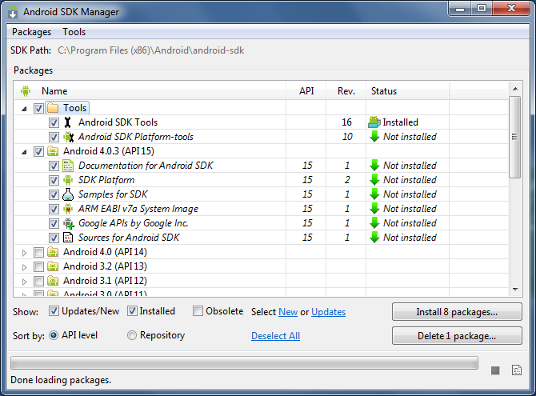
This post follows the android app development process from the beginning and includes a few FAQs about environment setup, development and debugging. Through this post, I will demonstrate the basic process of developing an android application. Since there are a lot of tutorials for android app development out on the web, I would not be going into too much detail with things that are already available. The first step before we can start developing the android app is to obtain Java Development Kit, Eclipse and finally the Android SDK. I assume that the installation of JDK and Eclipse are pretty straightforward and therefore would skip that. To install the Android SDK, run the exe file that you downloaded from the link. Sometimes it doesn’t recognize the JDK. If you are sure that you have a JDK, and the installation is still not recognizing the version, try going back and then coming forward again ;). It would install the SDK manager for android on Windows. Then you can download platforms and other components using the sdk manager. It will present you with a window where you can chose the components to download.

The basic steps for developing applications with or without Eclipse are the same:
- Set up Android Virtual Devices or hardware devices. You need to create Android Virtual Devices (AVD) or connect hardware devices on which you will install your applications. See Managing Virtual Devices and Using Hardware Devices for more information.
<li>Create an Android project.An Android project contains all source code and resource files for your application. It is built into an .apk package that you can install on Android devices.
<li>Build and run your application.If you are using Eclipse, builds are generated each time you save changes and you can install your application on a device by clicking Run. If you’re using another IDE, you can build your project using Ant and install it on a device using adb.
<li>Debug your application with the SDK debugging and logging tools.Debugging your application involves using a JDWP-compliant debugger along with the debugging and logging tools that are provided with the Android SDK. Eclipse already comes packaged with a compatible debugger.
<li>Test your application with the Testing and Instrumentation framework.The Android SDK provides a testing and instrumentation framework to help you set up and run tests within an emulator or device.
Lets begin creating a new android project using eclipse. The ADT plugin creates a template that you require for creating a new android project. To begin a new project, Go to Eclipse `-> File -> New -> Project ->` Android Project. If you can't find the Android project option in the create new project panel, probably you have some error in the installation of ADT plugin. While the creation of new project, it will ask the version of android that you would like to develop for. For example, if you choose Android 2.1, your application will be compiled against the Android 2.1 platform library. The target you choose here does not have to match the target you chose for your AVD; however, the target must be equal to or lower than the target you chose for your AVD. Android applications are forward-compatible, which means an application will run on the platform against which it is built as well as all platforms that are released in the future. For example, an application that is built against the 2.1 platform library will run normally on an AVD or device that is running the 2.3.3. The reverse is not true. Another thing different from the traditional projects is that android projects have one (ore more) activity. This is a subclass of Android's Activity class. An Activity is simply a class that can run and do work. It can create a UI if it chooses, but it doesn't need to. As the checkbox suggests, this is optional, but an Activity is almost always used as the basis for an application.
Android provides several views to assist developers in the development. The easiest of them all is the Text View which is used to display some text in the activity. the following code displays the text Hello, Android in the application’s main activity.
package com.example.helloandroid;

import android.app.Activity;
import android.os.Bundle;
import android.widget.TextView;

public class HelloAndroid extends Activity {
   /** Called when the activity is first created. */
   @Override
   public void onCreate(Bundle savedInstanceState) {
       super.onCreate(savedInstanceState);
       TextView tv = new TextView(this);
       tv.setText("Hello, Android");
       setContentView(tv);
   }
}
This completes our basic android application. Now we can see how it looks by using the ADT plugin to run the application. Simply run the project as Android app and eclipse would automatically start the emulator (if its not already running), install the application on emulator and start the application’s main activity. The following image shows how the android application should look like in the emulator.

This completes this tutorial on android application development. However, there are several other standards that should be followed for the android app to be easily extensible. I would be talking about some of these in detail in my further tutorials. I hope that this will serve as a good starting point for building android applications.
